Well, now that warmer weather approaches, I am beginning to see some of my spring medicinal and salad stand-bys popping up. Now is the time to spring clean the body, to use tonic and purifying herbs to cleanse the blood after a winter of heavier foods and a more sedentary existence.
Some medicinal herbs like Dandelion , Taraxacum officinale, will remain as a green herb in the grass all winter long, which makes dandelions greens a useful winter salad green. It is possible to see a stalwart Dandelion blooming in the grass on a sunny day even late winter in our area. Dandelions are known for their ability to cleanse the blood, and so are often used in a spring tonic.
The plant is useful in all of its parts. The greens, when picked while young and tender, can be added to salads, they are slightly bitter, but in a salad of other greens are very palatable. When slightly older leaves are picked, it is a good idea to blanch them or stir fry them to reduce the bitterness that they take on. The greens are full of vitamins A, B, C, and D as well as, iron, potassium and zinc. The best time to pick Dandelion greens for salads is before they start to bloom, in late winter and early spring.
The flowers are used to make Dandelion wine, (*Dandelion pollen can cause a histamine response in people prone to ragweed pollen allergies, but the greens and roots would not be an allergen), the roots can be roasted and made into a coffee-like beverage, and are also used with other roots, in the making of old-timey root beer.
Dandelions have many medicinal uses. The leaves are used as a diuretic to increase urine output and cleanse kidneys. Dandelions may prove useful in treating high blood pressure, due to its diuretic capabilities, (*Due to its high potassium levels, dandelion can also increase the risk of hyperkalemia when taken with potassium-sparing diuretics.) It is good for the liver and gallbladder and helps to increase bile production, Thus they also stimulate appetite and aid in digestion. The Dandelion flower is an antioxidant. The roots can be used as a gentle laxative. Dandelion may also help normalize blood sugar levels and lower total cholesterol and triglycerides, as well as raising HDL, "good" cholesterol.
Here a fun recipe to play with in your foraging efforts.
Dandelion Pesto
Ingredients
Raw pumpkin seeds, 3/4-1 cup unsalted raw pumpkin seeds, (or if preferred, raw sunflower seeds)
Garlic cloves, 3 pressed in a garlic press
Onion, 1/4 of a white or yellow onion,(I use onion to reduce the amount of oil necessary in the recipe)
Nutritional Yeast, 1/4-1/3 cup
Extra Virgin Cold Pressed Olive Oil, 1/4 cup or more as needed to get desired consistency
Fresh Squeezed Lemon Juice, one lemon's juice or enough lemons to equal 1/4 cup juice
Salt, ample 1/2 tsp.
Freshly cracked black pepper, to taste
Dandelion Greens, 1 cup tender new leaves
Cilantro, 1 cup leaves and stems
Instructions
In a blender place olive oil, lemon juice, onion, garlic, nutritional yeast, salt and pepper.
Blend until liquefied. Add pumpkin seeds or sunflower seeds or a mixture of the two, dandelion greens and cilantro. blend until a thick paste. If the pesto seems dry, taste and see if there is enough lemon to suit, if it can take more then add lemon juice to make a more moist paste. If there is enough lemon for your taste add water instead of lemon, just a little at a time until desired consistency is achieved.
Toss this with spiralized raw zucchini for a raw pesto "pasta" dish, or cook pasta al dente, cool slightly and toss with pesto. (cooling pasta a little allows you to maintain all the vitamins and enzymes in the raw pesto. Top with your choice of raw veggies, some suggestions would be cherry tomatoes halved, avocado chunks, black olives, capers, and diced cucumbers.
Provecho!
** This information is intended for educational purposes only and is not intended as suggested treatment for illness. Do your own research and make educated decisions about whether on not to use dandelion or any other herb as a medicine. As with any herb or medicine , be it pharma or herbal, there are possibilities of drug interactions. If you are on prescription diuretics, blood thinners or Lithium, consult you medical professional before using dandelion. Those who are allergic to ragweed pollen, chrysanthemums, marigold, chamomile, yarrow, daisies, or iodine, should avoid dandelion. **
March 26, 2016
March 10, 2016
Fire on the Mountain Tonic
I don't take flu shots... Some day I will write a post on why, but for today I just want to talk about what I do instead of introducing heavy metals,(Thimerosal/ethyl mercury) and live (although "weakened"), virus into my system. There are natural ways to make it through cold and flu season without succumbing to every bug that is being passed around the office and lurking on every shopping cart handle.
To start with, it is important to be diligent to thoroughly and frequently wash your hands when in public places. Keep your hands away from your face and your fingers out of your mouth. Use a non isoprophyl alcohol based hand sanitizer when you can't wash your hands. I use lemon essential oil that I keep in a key fob case with 7 other essential oils. I just drop a drop or two on my hands and rub them together front and back. Then I breathe deeply from the bottle to get the lemon vapors up into my nostrils. Lemon will kill many pesky germs on contact and is much safer to use than the alcohol based sanitizers. Be mindful that there are a lot of people who take no precautions when they are sick, don't cover their mouth with their forearm instead of their hands when they cough or sneeze, come to work with a fever, sneezing and coughing, go shopping and touch shopping carts with hands that they just sneezed into, eat out and use their germ infested hands to serve themselves from the salad bar or drink dispenser.... all while spreading the wealth of their illness with everyone who may come in contact with them or things that they have touched. So whenever possible, avoid public eating and other potential harvest fields of germs like public bathrooms. I know it isn't possible to avoid all public contact, especially if you work in a place that wants you to show up for work, sick or not... but taking precautions like hand washing and avoiding what contact you can with the public at large will cut your risks of infection down a lot.
Besides exercising diligent germ fighting hygiene measures, there are some very effective proactive natural medicine routines that you can use to fight off illness. All of my family has their own bottle of Thieves, (Young Living, good but very pricey), or in our case 4x, (Secrets of Eden, it is the same thing as Thieves but a lot more affordable). We take it a couple times a day proactively, and use it more frequently if we are in public or feel like we are coming down with something. We have a infuser for our car that plugs into the cigarette lighter. We keep either 4x or lemon essential oils going in the car infuser so we are breathing it into our nostrils and into our lungs where it can kill bacteria that we may breathe in while in public. I also brush my teeth with it, using a drop or two on my tooth brush along with my home made toothpaste, or a drop or two in the water receptacle of my Waterpik. This kills germs as well as promotes good oral health.
While practicing health hygiene and using essential oils to stave off infection is effective, we go one step further and our version of a flu shot... Fire tonic. This tonic is a powerful tool against flu virus' and bacterial infection. Unlike the
flu shot which is made in a lab using live virus or virus byproducts, and stabilized with heavy metals like ethyl mercury, Fire Tonic is made in your kitchen, using fresh, living. organic (where possible), ingredients. The flu shot must be administered by a "medical professional", where you can take the Fire Tonic at home with no co pay. I will warn you that it takes some getting used to, but the benefits far outweigh its fiery personality. There are many recipes for tonic out there, but for the most part, the basic ingredients are the same, raw organic apple cider vinegar with mother, (from now on referred to as ACVM), horseradish, ginger, garlic and hot peppers. My recipe takes things a step further, to bring in some other germ fighting immune strengthening components. This tonic is taken daily, a shot glass full as soon as the tummy is ready for it. Once you get used to the fiery jolt, you will start to look forward to your daily "shot", and will enjoy the mood elevating, endorphin buzz you will get from it...
There are two basic ways to make this tonic, one is to put the fresh ingredients together in a blender, put the blended ingredients in a 1/2 gallon jar and let it steep in ACVM for several weeks. Then strain and press all the ingredients through cheesecloth, to derive the fiery liquid gold. The other way is to arrange the ingredients in a jar, add water and salt and let it ferment naturally for 4 weeks, then strain, press and bottle. Each has its own virtues, the ACVM has many health benefits, and the fermentation of the other adds much needed probiotic bacteria to the mix. Either one is effective against virus and bacterial infections. I have decided that for my family, it is best to make both. The vinegar based tonic stores for the long term, very well, the fermented tonic requires refrigeration, or if not refrigerated, to be used up in a week or two after full fermentation ceases, so when possible we use the fermented version daily and keep the vinegar version on hand for times when we don't have the fermented version available and for longer term storage.
In my recipes I use these basic tonic ingredients:
Horseradish- which is full of vitamin C and B complex, minerals, potassium, calcium, iron and enzymes. It prevents scurvy, is an expectorant, can treat tonsillitis, and is a natural treatment for rheumatoid arthritis, as well as many respiratory ailments. It can kill the bacteria that causes bronchitis, strengthens the heart, increases resistance to cancer, is a powerful antioxidant and detoxifies the liver to eliminate carcinogens.
Ginger- a natural blood thinner, reduces cholesterol, lowers fever, is sedative and antibacterial, anti-fungal, and settles the stomach and soothes intestinal distress. Contains gingerol a powerful anti-inflammatory and anti-oxidant. May reduce muscle pain and soreness. Lowers blood sugar levels and improves heart health. Improves brain function and may guard against brain degradation and dementia. Reduces menstrual pain. The substance called 6-gingerol aids in the prevention of some kinds of cancer, (pancreatic, colon, breast and ovarian cancer, testing and research continues).
Onion-A potent diuretic, it is antibiotic and anti-inflammatory, it is an effective expectorant, making it useful for use colds, flu and persistent coughs, Onions are rich in quercetin, which has been shown to prevent heart disease, by stopping cholesterol from attaching to arterial walls and prevents blood platelets from sticking together and forming clots.
Hot Peppers- contain capsicum which supports the immune system. It also acts as a natural decongestant and has warming properties that alleviate chills. It has anti- inflammatory and analgesic properties which make it a useful pain killer. Helps treat cancer, peptic ulcer, menopausal problems, lowers the risk of cardiovascular disease and diabetes. Relives the symptoms of fibromyalgia. Is good for the skin and treats psoriasis.

Raw Apple Cider Vinegar- is a natural antiseptic, anti-fungal, is great for digestion, detoxifying, lowers blood sugar levels. It can help with weight loss by promoting satiety and lowering glucose and insulin levels. Helps reduce blood pressure. Has been observed to reduce the size of cancerous tumors and can kill cancer cells. It can cut down on nighttime leg cramps, (an indication of a potassium deficiency), When coupled with honey, apple cider vinegar helps relieve the symptoms of rheumatoid arthritis. Arthritis pain in part is caused by metabolic waste that is stored in the connective tissue, the pectin, acetic acid and mallic acid in ACVM absorbs toxins and helps to flush them from the body. It alkalinizes the body and clears out acid crystal build up in the joints. It is a great source of the nutrient potassium, which is often in low levels in RA patients.
And I add to the basic ingredients:
Turmeric root- An effective anti-inflammatory. Low level inflammation is in large part responsible for almost all chronic illness, including heart disease, cancer, metabolic syndrome, Alzheimer's, and other degenerative and auto-immune conditions. Curcumin is the substance within turmeric root which has most of the medicinal properties. Curcumin reduces inflammation at the molecular level. It is an antioxidant, so it eliminates free radicals and stimulates the body to increase production it's own antioxidant enzymes. It improves brain function by boosting BDNF, the body's neurotrophic factor, thus improving brain function and lowering the risk of brain disease.The molecular changes caused by cucurmin prevent cancerous cells from forming, having an affect on active cancer as well as preventing the division of cancerous cells. Curcumin can cross the blood brain barrier, a rare attribute, and is able to interrupt the progression of Alzheimer's and help the brain to heal. Arthritis, in some cases is more effectively treated with curcumin than with pharmaceuticals. It has a profound affect on depression, actually proving more effective in clinical studies than Prozac for alleviating the symptoms of depression. It does this by boosting the BDNF levels and increasing the body's ability to produce it's own serotonin and dopamine. It is hard for the body to absorb turmeric, but with the addition of piperzine, a substance found in black pepper corns, the absorption rate can be improved by 2000%. so turmeric should always be used in combination with black pepper. Do not use if pregnant!! Can cause uterine contractions.
Lemon-Although lemon is acidic outside the body once it is in the digestive tract it becomes alkaline. So lemon is a good ph balancer for the blood. Lemon is high in vitamin C, increasing the immune system's ability to fight off infection. It increases the production of bile aiding in digestion efficiency and dissolves uric acid which causes joint pain and is a component of some kinds of kidney stones. It can aid increase the body's ability to burn fat. Helps to maintain eye health. Detoxifies kidneys and liver.
Rosemary-Is a powerful detoxifier and has a calming effect on the nervous system. Rosemary contains rosmarinic, a compound that improves blood circulation, increasing the flow of oxygen rich blood to the brain. This improves concentration, alertness and promotes relaxation. It is anti-microbial. Rosemary contains components that fortify the immune system. It stimulates the adrenals, providing more energy while it elevates mood and calms nerves. Inhibits the growth of bacteria like e. coli. Protects the lungs from irritation and inflammation from environmental toxins.
Black Pepper- It is useful in fighting the common cold, constipation, indigestion, anemia, impotency, muscular strains, dental disease, pyorrhea (a dental disease), diarrhea, and heart disease. It contains manganese, iron, potassium, vitamin-C, vitamin K, and dietary fiber. Black pepper is also a very good anti-inflammatory agent. It aids in digestion by increasing the production of hydrochloric acid in the stomach, will detox the body by promoting sweating and urination. The outer shell of the pepper corn breaks down fat cells so that they are more easily accessed by the body , thus aiding in natural weight loss. So be sure to use whole pepper corns, cracked with a blender or mortar and pestle, to gain all the benefits that black pepper has to offer. But most importantly, it is necessary to use turmeric and black pepper in combination so that the body can take up the health benefits of turmeric. Without using black pepper with turmeric most of the healing properties of the turmeric pass through the body without being absorbed.

All ingredients that can be organic should be... I know that it is hard to find some of these ingredients in organic.
Ingredients
2 cups of habanero peppers, split, (for those who are able to take the heat), or 3 cups of jalapenos, cut into 1/4" rings. If using jalapenos, then omit the next ingredient in the list, they are added to this amount for a total of the required peppers.
1 cup fresh jalapeno, cut into 1/4" rings
6 whole bulbs of garlic, cut in half through the equator, reserve two halves to be kept intact break apart the rest and bruise/mash with the flat edge of a knife. (No need to peel the cloves)
12 inches of fresh horseradish root, Scrub with a brush but do not peel, cut into 1/2" cubes
1 large hand of fresh ginger, or enough ginger root to equal 2 cups sliced ginger, washed and sliced into 1/4" thick slices. Do not peel.
1 cup sliced turmeric root, (10-12 rhizomes of fresh turmeric)
1/4 cup black peppercorns, bruised and cracked in a mortar and pestle or given a quick whirlin a bullet blender, you don't want it powdered just bruised and cracked.
1 large onion, root end and tip end cut off, loose skin removed, (leave the rest of the skin on), then cut into thin slices
2- 6" sprigs of rosemary
4 1/4" slices of lemon, (wash lemon well before slicing)
1/4 tsp. salt
1/2 capsule of probiotic acidophilis, (optional)
Purified water to fill jar
Equipment
Apron
Sharp knife
Mandolin with slicing blade, optional but makes things more uniform and goes faster
1 half gallon Mason jar
4 oz. mason jar
Plastic wide mouth Mason jar lid (can be found at Walmart in the canning section, or purchased on Amazon,com), or a piece of plastic wrap and a two part metal Mason jar lid, ( *Due the fact that metal that is not stainless steel can taint the fermentation process, it is necessary to use a plastic lid or put a piece of plastic wrap between the rim of the jar and the two part wide mouth mason jar lid.)
Glass craft beads to fill the 4 0z. jar Mortar and pestle or bullet-type blender
Plastic sandwich bag Nitrile or latex gloves
8"square pyrex dish or comparable sized plastic container with 1 inch sides
Strainer
Funnel
16x16" square of cheese cloth
Quart sized Mason Jar or two or glass bottle with tight fitting lid that will hold the volume of rendered liquid
Wipeable,impermeable tablecloth
Instructions
Cover your work surface with wipeable tablecloth. Why? Well, the turmeric root will
stain whatever it touches and it will not come out. Don the apron and make sure to put on your nitrile/latex gloves. If you have sensitive skin, double glove your hands.
Sterilize both 1/2 gallon and 4 oz.jar by pouring boiling water to the brim and leave sitting until cool enough to handle. Pour off water and dry jar with a fresh, clean towel. Lay the 1/2 gallon jar on its side and place lemon slices around the walls of jar on 3 sides, then take a couple of handfuls of horseradish cubes and place them in the jar to hold lemon slices to the sides. Set jar upright and place last slice on the forth wall of the jar. Place remaining horseradish in the jar. Then put in a layer of turmeric root, and then the onions. Place two halves of garlic bulbs, cut side out against the side of the jar on opposite walls of the jar, on the other two walls place the rosemary sprigs, then back fill with a layer of ginger, then jalapeno slices, and habaneros (if using), topping off with the layer of freshly cracked black pepper and the garlic. Press down on the veggie in the jar firmly.
Dissolve the salt in 2 cups of water, pour into the jar and then fill the jar the rest of the way with water to just cover the top of the veggies. The veggie and water level should come to just below where the neck of the jar begins to taper in some, (This will leave you room to put the smaller 4 oz. jar and glass weights in.)
Take the plastic sandwich bag and place it over the mouth of the 1/2 gallon mason jar, with fingers press down gently, arranging the plastic bag so that it is in contact with the entire surface of the vegetables.
Take the 4 oz. jar filled with glass beads and place it in the mouth of the jar, on top of the plastic bag.
Place 1/2 gallon jar in a casserole dish or in the sink then press down on the smaller jar, some liquid will flow out of the 1/2 gallon jar, (which is why it is in a casserole dish or in the sink). Take plastic lid that fits a wide mouth Mason Jar and put it on the 1/2 gal. jar and screw down tight. If the lid won't go on, it may be necessary to take the 4 oz. jar out and press the veggies down harder to make room for the weight jar, (some fluid is sure to go over the edges so make sure the 1/2 gal. jar is on the plate or in the sink) , then replace the weight and screw plastic lid on firmly. Invert the jar once or twice to dislodge air bubbles and look to make sure the veggies are completely submerged. If not, take the lid off, the weight jar and sandwich bag out and top off with a little water. replace, sandwich bag weight and lid, then invert again.
At this point, place the 1/2 gallon jar in a casserole dish or other plastic container to catch any liquid that might bubble out of the jar during the fermentation process and place out of the way, in a quiet corner of the kitchen counter. Invert at least twice a day for the first week, then once a day for the next 6 weeks.
At the end of the fermentation pour off the liquid from the veggies into a bowl and place the veggies in the blender. Pulse until the veggies are well broken up, but not a puree.
Pour the veggies and liquid back in the 1/2 gallon jar or into a bowl or other receptical that can hold it all if you are using the 1/2 jar as the storage container, and place a strainer lined with a layer of cheese cloth in the bowl that held the liquid previously. Stir the contents of the jar well and then slowly pour through cheese cloth, a little at a time. When the liquid level begins to approach the bottom of the strainer, stop and pour liquid off into the storage bottle. Continue to pour off and decant until the jar is empty.
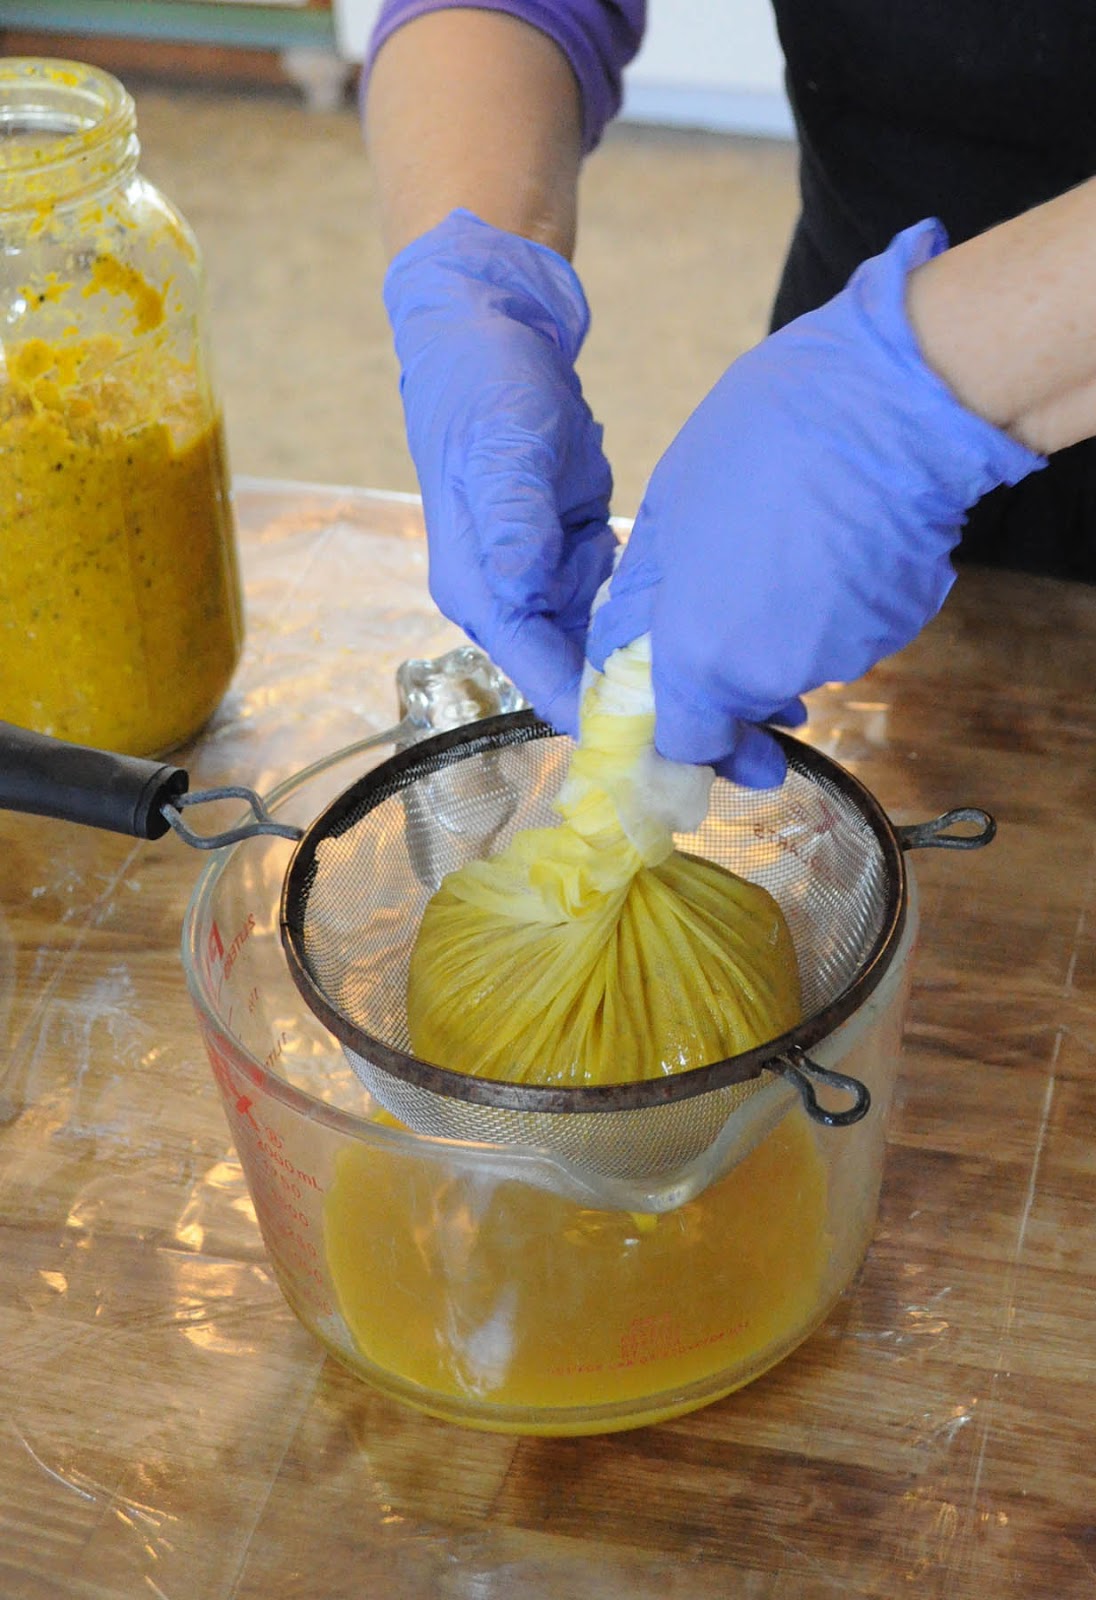
There will be solids left in the cheese cloth that still have liquid in them, so using a pair of latex gloves, (remember there are hot peppers in this mix and they will burn the skin on bare hands), gather up the corners of the cheese cloth and twist them together until they begin to apply pressure to the contents of of the cheese cloth, then gently twist and squeeze the cheese cloth "bag" until no more liquid will drip out.
Deposit the contents of the cheesecloth into the compost container and set the cloth aside on a plate or in a bowl to be dealt with later.
Once all the liquid is squeezed out and in the storage container, cap it tightly and store in the refrigerator.
* Note about clean up...Carefully rinse the cheesecloth, being sure not to get the residue left in the cheese cloth on your skin, clothing or stainable surfaces. and then submerse in a pan of hot soapy water, leave to soak for a couple of hours and then with latex gloves, hand wash cloth and hang dry. Reserve this cheese cloth for this particular process since the turmeric will permanently stain it and no matter how often you wash it, the pepper oils will linger in the cloth fibers.
To use:
Measure 1 - 1 1/2 ozs. in a shot glass,( a good place to start, but eventually you want to be up to 2 oz. per dose), and drink in 6 oz. of water, add a little honey if necessary to get it down, (or do what I do and just throw it back it one mouthful and swallow...not recommended for the uninitiated or faint of heart...), and oh yea... best taken on a full stomach.... This tonic will cure what ails you and will keep your immune system strong so that you don't catch every bug that is floating around out there. How does the old saying go...? "What doesn't kill you will make you stronger..." Really, I am not trying to scare you off... this stuff is great for your immune system and will strengthen you, protect and heal you from so many ailments it is worth the effort to make it and acquire a tolerance to it's fiery nature, but you will need to take it slow and build up to the recommended dose. Drink it mixed with as much water as necessary to make it comfortable for you, but you want to get the whole dose down, so don't put it in so much water that you don't get it finished.
Ingredients
2 64 oz. bottles of organic apple cider vinegar with mother, (Braggs make a very good one, but it is expensive. I have found a very acceptable option at Sam's, Nature's Intent organic apple cider vinegar with mother. It is much more affordable and I can't taste a difference. The important part is that it is organic, raw and has "mother" in it, which is a collection of living organisms composed of a form of cellulose and acetic acid bacteria that develops on fermenting alcoholic liquids, which turns alcohol into acetic acid with the help of oxygen from the air).
2 cups of habanero peppers, split, (for those who are able to take the heat), or 3 cups of jalapenos, cut into 1/4" rings. If using jalapenos, then omit the next ingredient in the list, they are added to this amount for a total of the required peppers.
1 cup fresh jalapeno, cut into 1/4" rings
6 whole bulbs of garlic, cut in half through the equator,reserve two halves to be kept intact break apart the rest and bruise/mash with the flat edge of a knife. (No need to peel the cloves)
12 inches of fresh horseradish root, Scrub with a brush but do not peel, cut into 1/2" cubes
1 large hand of fresh ginger, or enough ginger root to equal 2 cups sliced ginger, washed and sliced into 1/4" thick slices. Do not peel.
1 1/2-2 cups sliced turmeric root, (12-15 or so rhizomes of fresh turmeric)
1/4 cup black peppercorns, bruised and cracked in a mortar and pestle or given a quick whirl in a bullet blender, you don't want it powdered just bruised and cracked.
1 large onion, root end and tip end cut off, loose skin removed, (leave the rest of the skin on), then cut into thin slices
2- 6" sprigs of rosemary
4 1/4" slices of lemon,(wash lemon well before slicing)
1/4 tsp. salt
Equipment
Apron
Sharp knife
Mandolin with slicing blade, optional but makes things more uniform and goes faster
2 half gallon Mason jars
2 4 oz. mason jar
2 Plastic wide mouth Mason jar lid (can be found at Walmart in the canning section, or purchased on Amazon,com), or a piece of plastic wrap and a two part metal Mason jar lid, ( *Due the fact that metal that is not stainless steel can taint the fermentation process, it is necessary to use a plastic lid or put a piece of plastic wrap between the rim of the jar and the two part wide mouth mason jar lid.)
Nitrile or latex gloves
9x13" pyrex dish or comparable sized plastic container with 1 inch sides
Strainer
16x16" square cheesecloth
Funnel
12x16" or larger piece of cheese cloth
1/2 gallon mason Jar or glass bottle with tight fitting lid that will hold the final volume of liquidWipeable, impermeable tablecloth
Instructions
Cover your work surface with wipeable tablecloth. Why? Well, the turmeric root will stain whatever it touches and it will not come out. Don the apron and make sure to put on your nitrile/latex gloves. If you have sensitive skin, double glove your hands.
Sterilize all jars by pouring boiling water to the brim and leave sitting until cool enough to handle. Pour off water and dry jar with a fresh, clean towel.
Place all ingredients except for the lemon slices in a blender in batches and blend with just enough vinegar to get things moving in the blender. Divide the blended ingredients equally between the two 1/2 gallon Mason jars and drop 2 lemon slices in each jar. Fill to the top with the apple cider vinegar.
Cover tightly with the plastic lids or with a piece of plastic wrap and the two part mason jar lids. Place in a tray or on a plate so that anything that might leak out drips on the tray and not your counter top. Place in a quiet part of your counter top where you will see it and remember to invert the jars twice a day for a week and then once a day for 4-6 weeks.
When ready, extract the tonic using the technique in the recipe above. Decant into storage container, just make sure that the tonic will fill the container leaving as little airspace as possible, to prevent any oxidization. This tonic is shelf stable and does not need to be refrigerated, although it does go down better if it is cold. Since this tonic takes awhile to make, (6 weeks), and will last indefinitely. It is a good idea to double or triple the recipe, to make sure you have plenty on hand and don't have to make it very often.
To use:
Measure 1 - 1 1/2 ozs. in a shot glass,(a good place to start, but eventually you want to be up to 2 oz. per dose), and drink in 6 oz. of water, add a little honey if necessary to get it down, (or do what I do and just throw it back it one mouthful and swallow...not recommended for the uninitiated or faint of heart...), and oh yeah... best taken on a full stomach.... This tonic will cure what ails you and will keep your immune system strong so that you don't catch every bug that is floating around out there. How does the old saying go...? "What doesn't kill you will make you stronger..." Really, I am not trying to scare you off... this stuff is great for your immune system and will strengthen you, protect and heal you from so many ailments it is worth the effort to make it and acquire a tolerance to it's fiery nature, but you will need to take it slow and build up to the recommended dose. Drink it mixed with as much water as necessary to make it comfortable for you, but you want to get the whole dose down, so don't put it in so much water that you don't get it finished.
To start with, it is important to be diligent to thoroughly and frequently wash your hands when in public places. Keep your hands away from your face and your fingers out of your mouth. Use a non isoprophyl alcohol based hand sanitizer when you can't wash your hands. I use lemon essential oil that I keep in a key fob case with 7 other essential oils. I just drop a drop or two on my hands and rub them together front and back. Then I breathe deeply from the bottle to get the lemon vapors up into my nostrils. Lemon will kill many pesky germs on contact and is much safer to use than the alcohol based sanitizers. Be mindful that there are a lot of people who take no precautions when they are sick, don't cover their mouth with their forearm instead of their hands when they cough or sneeze, come to work with a fever, sneezing and coughing, go shopping and touch shopping carts with hands that they just sneezed into, eat out and use their germ infested hands to serve themselves from the salad bar or drink dispenser.... all while spreading the wealth of their illness with everyone who may come in contact with them or things that they have touched. So whenever possible, avoid public eating and other potential harvest fields of germs like public bathrooms. I know it isn't possible to avoid all public contact, especially if you work in a place that wants you to show up for work, sick or not... but taking precautions like hand washing and avoiding what contact you can with the public at large will cut your risks of infection down a lot.
Besides exercising diligent germ fighting hygiene measures, there are some very effective proactive natural medicine routines that you can use to fight off illness. All of my family has their own bottle of Thieves, (Young Living, good but very pricey), or in our case 4x, (Secrets of Eden, it is the same thing as Thieves but a lot more affordable). We take it a couple times a day proactively, and use it more frequently if we are in public or feel like we are coming down with something. We have a infuser for our car that plugs into the cigarette lighter. We keep either 4x or lemon essential oils going in the car infuser so we are breathing it into our nostrils and into our lungs where it can kill bacteria that we may breathe in while in public. I also brush my teeth with it, using a drop or two on my tooth brush along with my home made toothpaste, or a drop or two in the water receptacle of my Waterpik. This kills germs as well as promotes good oral health.
While practicing health hygiene and using essential oils to stave off infection is effective, we go one step further and our version of a flu shot... Fire tonic. This tonic is a powerful tool against flu virus' and bacterial infection. Unlike the
flu shot which is made in a lab using live virus or virus byproducts, and stabilized with heavy metals like ethyl mercury, Fire Tonic is made in your kitchen, using fresh, living. organic (where possible), ingredients. The flu shot must be administered by a "medical professional", where you can take the Fire Tonic at home with no co pay. I will warn you that it takes some getting used to, but the benefits far outweigh its fiery personality. There are many recipes for tonic out there, but for the most part, the basic ingredients are the same, raw organic apple cider vinegar with mother, (from now on referred to as ACVM), horseradish, ginger, garlic and hot peppers. My recipe takes things a step further, to bring in some other germ fighting immune strengthening components. This tonic is taken daily, a shot glass full as soon as the tummy is ready for it. Once you get used to the fiery jolt, you will start to look forward to your daily "shot", and will enjoy the mood elevating, endorphin buzz you will get from it...There are two basic ways to make this tonic, one is to put the fresh ingredients together in a blender, put the blended ingredients in a 1/2 gallon jar and let it steep in ACVM for several weeks. Then strain and press all the ingredients through cheesecloth, to derive the fiery liquid gold. The other way is to arrange the ingredients in a jar, add water and salt and let it ferment naturally for 4 weeks, then strain, press and bottle. Each has its own virtues, the ACVM has many health benefits, and the fermentation of the other adds much needed probiotic bacteria to the mix. Either one is effective against virus and bacterial infections. I have decided that for my family, it is best to make both. The vinegar based tonic stores for the long term, very well, the fermented tonic requires refrigeration, or if not refrigerated, to be used up in a week or two after full fermentation ceases, so when possible we use the fermented version daily and keep the vinegar version on hand for times when we don't have the fermented version available and for longer term storage.
In my recipes I use these basic tonic ingredients:
Horseradish- which is full of vitamin C and B complex, minerals, potassium, calcium, iron and enzymes. It prevents scurvy, is an expectorant, can treat tonsillitis, and is a natural treatment for rheumatoid arthritis, as well as many respiratory ailments. It can kill the bacteria that causes bronchitis, strengthens the heart, increases resistance to cancer, is a powerful antioxidant and detoxifies the liver to eliminate carcinogens.
Ginger- a natural blood thinner, reduces cholesterol, lowers fever, is sedative and antibacterial, anti-fungal, and settles the stomach and soothes intestinal distress. Contains gingerol a powerful anti-inflammatory and anti-oxidant. May reduce muscle pain and soreness. Lowers blood sugar levels and improves heart health. Improves brain function and may guard against brain degradation and dementia. Reduces menstrual pain. The substance called 6-gingerol aids in the prevention of some kinds of cancer, (pancreatic, colon, breast and ovarian cancer, testing and research continues).
Onion-A potent diuretic, it is antibiotic and anti-inflammatory, it is an effective expectorant, making it useful for use colds, flu and persistent coughs, Onions are rich in quercetin, which has been shown to prevent heart disease, by stopping cholesterol from attaching to arterial walls and prevents blood platelets from sticking together and forming clots.
Hot Peppers- contain capsicum which supports the immune system. It also acts as a natural decongestant and has warming properties that alleviate chills. It has anti- inflammatory and analgesic properties which make it a useful pain killer. Helps treat cancer, peptic ulcer, menopausal problems, lowers the risk of cardiovascular disease and diabetes. Relives the symptoms of fibromyalgia. Is good for the skin and treats psoriasis.

Raw Apple Cider Vinegar- is a natural antiseptic, anti-fungal, is great for digestion, detoxifying, lowers blood sugar levels. It can help with weight loss by promoting satiety and lowering glucose and insulin levels. Helps reduce blood pressure. Has been observed to reduce the size of cancerous tumors and can kill cancer cells. It can cut down on nighttime leg cramps, (an indication of a potassium deficiency), When coupled with honey, apple cider vinegar helps relieve the symptoms of rheumatoid arthritis. Arthritis pain in part is caused by metabolic waste that is stored in the connective tissue, the pectin, acetic acid and mallic acid in ACVM absorbs toxins and helps to flush them from the body. It alkalinizes the body and clears out acid crystal build up in the joints. It is a great source of the nutrient potassium, which is often in low levels in RA patients.
And I add to the basic ingredients:
Turmeric root- An effective anti-inflammatory. Low level inflammation is in large part responsible for almost all chronic illness, including heart disease, cancer, metabolic syndrome, Alzheimer's, and other degenerative and auto-immune conditions. Curcumin is the substance within turmeric root which has most of the medicinal properties. Curcumin reduces inflammation at the molecular level. It is an antioxidant, so it eliminates free radicals and stimulates the body to increase production it's own antioxidant enzymes. It improves brain function by boosting BDNF, the body's neurotrophic factor, thus improving brain function and lowering the risk of brain disease.The molecular changes caused by cucurmin prevent cancerous cells from forming, having an affect on active cancer as well as preventing the division of cancerous cells. Curcumin can cross the blood brain barrier, a rare attribute, and is able to interrupt the progression of Alzheimer's and help the brain to heal. Arthritis, in some cases is more effectively treated with curcumin than with pharmaceuticals. It has a profound affect on depression, actually proving more effective in clinical studies than Prozac for alleviating the symptoms of depression. It does this by boosting the BDNF levels and increasing the body's ability to produce it's own serotonin and dopamine. It is hard for the body to absorb turmeric, but with the addition of piperzine, a substance found in black pepper corns, the absorption rate can be improved by 2000%. so turmeric should always be used in combination with black pepper. Do not use if pregnant!! Can cause uterine contractions.
Lemon-Although lemon is acidic outside the body once it is in the digestive tract it becomes alkaline. So lemon is a good ph balancer for the blood. Lemon is high in vitamin C, increasing the immune system's ability to fight off infection. It increases the production of bile aiding in digestion efficiency and dissolves uric acid which causes joint pain and is a component of some kinds of kidney stones. It can aid increase the body's ability to burn fat. Helps to maintain eye health. Detoxifies kidneys and liver.
Rosemary-Is a powerful detoxifier and has a calming effect on the nervous system. Rosemary contains rosmarinic, a compound that improves blood circulation, increasing the flow of oxygen rich blood to the brain. This improves concentration, alertness and promotes relaxation. It is anti-microbial. Rosemary contains components that fortify the immune system. It stimulates the adrenals, providing more energy while it elevates mood and calms nerves. Inhibits the growth of bacteria like e. coli. Protects the lungs from irritation and inflammation from environmental toxins.
Black Pepper- It is useful in fighting the common cold, constipation, indigestion, anemia, impotency, muscular strains, dental disease, pyorrhea (a dental disease), diarrhea, and heart disease. It contains manganese, iron, potassium, vitamin-C, vitamin K, and dietary fiber. Black pepper is also a very good anti-inflammatory agent. It aids in digestion by increasing the production of hydrochloric acid in the stomach, will detox the body by promoting sweating and urination. The outer shell of the pepper corn breaks down fat cells so that they are more easily accessed by the body , thus aiding in natural weight loss. So be sure to use whole pepper corns, cracked with a blender or mortar and pestle, to gain all the benefits that black pepper has to offer. But most importantly, it is necessary to use turmeric and black pepper in combination so that the body can take up the health benefits of turmeric. Without using black pepper with turmeric most of the healing properties of the turmeric pass through the body without being absorbed.

All ingredients that can be organic should be... I know that it is hard to find some of these ingredients in organic.
Fire on the Mountain Tonic # One
(Fermented)
Ingredients
2 cups of habanero peppers, split, (for those who are able to take the heat), or 3 cups of jalapenos, cut into 1/4" rings. If using jalapenos, then omit the next ingredient in the list, they are added to this amount for a total of the required peppers.
1 cup fresh jalapeno, cut into 1/4" rings
6 whole bulbs of garlic, cut in half through the equator, reserve two halves to be kept intact break apart the rest and bruise/mash with the flat edge of a knife. (No need to peel the cloves)
12 inches of fresh horseradish root, Scrub with a brush but do not peel, cut into 1/2" cubes
1 large hand of fresh ginger, or enough ginger root to equal 2 cups sliced ginger, washed and sliced into 1/4" thick slices. Do not peel.
1 cup sliced turmeric root, (10-12 rhizomes of fresh turmeric)
1/4 cup black peppercorns, bruised and cracked in a mortar and pestle or given a quick whirlin a bullet blender, you don't want it powdered just bruised and cracked.
1 large onion, root end and tip end cut off, loose skin removed, (leave the rest of the skin on), then cut into thin slices
2- 6" sprigs of rosemary
4 1/4" slices of lemon, (wash lemon well before slicing)
1/4 tsp. salt
1/2 capsule of probiotic acidophilis, (optional)
Purified water to fill jar
Equipment
Apron
Sharp knife
Mandolin with slicing blade, optional but makes things more uniform and goes faster
1 half gallon Mason jar
4 oz. mason jar
Plastic wide mouth Mason jar lid (can be found at Walmart in the canning section, or purchased on Amazon,com), or a piece of plastic wrap and a two part metal Mason jar lid, ( *Due the fact that metal that is not stainless steel can taint the fermentation process, it is necessary to use a plastic lid or put a piece of plastic wrap between the rim of the jar and the two part wide mouth mason jar lid.)
Glass craft beads to fill the 4 0z. jar Mortar and pestle or bullet-type blender
Plastic sandwich bag Nitrile or latex gloves
8"square pyrex dish or comparable sized plastic container with 1 inch sides
Strainer
Funnel
16x16" square of cheese cloth
Instructions
Cover your work surface with wipeable tablecloth. Why? Well, the turmeric root will
stain whatever it touches and it will not come out. Don the apron and make sure to put on your nitrile/latex gloves. If you have sensitive skin, double glove your hands.Sterilize both 1/2 gallon and 4 oz.jar by pouring boiling water to the brim and leave sitting until cool enough to handle. Pour off water and dry jar with a fresh, clean towel. Lay the 1/2 gallon jar on its side and place lemon slices around the walls of jar on 3 sides, then take a couple of handfuls of horseradish cubes and place them in the jar to hold lemon slices to the sides. Set jar upright and place last slice on the forth wall of the jar. Place remaining horseradish in the jar. Then put in a layer of turmeric root, and then the onions. Place two halves of garlic bulbs, cut side out against the side of the jar on opposite walls of the jar, on the other two walls place the rosemary sprigs, then back fill with a layer of ginger, then jalapeno slices, and habaneros (if using), topping off with the layer of freshly cracked black pepper and the garlic. Press down on the veggie in the jar firmly.
Dissolve the salt in 2 cups of water, pour into the jar and then fill the jar the rest of the way with water to just cover the top of the veggies. The veggie and water level should come to just below where the neck of the jar begins to taper in some, (This will leave you room to put the smaller 4 oz. jar and glass weights in.)
Take the plastic sandwich bag and place it over the mouth of the 1/2 gallon mason jar, with fingers press down gently, arranging the plastic bag so that it is in contact with the entire surface of the vegetables.
Take the 4 oz. jar filled with glass beads and place it in the mouth of the jar, on top of the plastic bag.
Place 1/2 gallon jar in a casserole dish or in the sink then press down on the smaller jar, some liquid will flow out of the 1/2 gallon jar, (which is why it is in a casserole dish or in the sink). Take plastic lid that fits a wide mouth Mason Jar and put it on the 1/2 gal. jar and screw down tight. If the lid won't go on, it may be necessary to take the 4 oz. jar out and press the veggies down harder to make room for the weight jar, (some fluid is sure to go over the edges so make sure the 1/2 gal. jar is on the plate or in the sink) , then replace the weight and screw plastic lid on firmly. Invert the jar once or twice to dislodge air bubbles and look to make sure the veggies are completely submerged. If not, take the lid off, the weight jar and sandwich bag out and top off with a little water. replace, sandwich bag weight and lid, then invert again.
At this point, place the 1/2 gallon jar in a casserole dish or other plastic container to catch any liquid that might bubble out of the jar during the fermentation process and place out of the way, in a quiet corner of the kitchen counter. Invert at least twice a day for the first week, then once a day for the next 6 weeks.
At the end of the fermentation pour off the liquid from the veggies into a bowl and place the veggies in the blender. Pulse until the veggies are well broken up, but not a puree.
Pour the veggies and liquid back in the 1/2 gallon jar or into a bowl or other receptical that can hold it all if you are using the 1/2 jar as the storage container, and place a strainer lined with a layer of cheese cloth in the bowl that held the liquid previously. Stir the contents of the jar well and then slowly pour through cheese cloth, a little at a time. When the liquid level begins to approach the bottom of the strainer, stop and pour liquid off into the storage bottle. Continue to pour off and decant until the jar is empty.
There will be solids left in the cheese cloth that still have liquid in them, so using a pair of latex gloves, (remember there are hot peppers in this mix and they will burn the skin on bare hands), gather up the corners of the cheese cloth and twist them together until they begin to apply pressure to the contents of of the cheese cloth, then gently twist and squeeze the cheese cloth "bag" until no more liquid will drip out.
Deposit the contents of the cheesecloth into the compost container and set the cloth aside on a plate or in a bowl to be dealt with later.
Once all the liquid is squeezed out and in the storage container, cap it tightly and store in the refrigerator.
* Note about clean up...Carefully rinse the cheesecloth, being sure not to get the residue left in the cheese cloth on your skin, clothing or stainable surfaces. and then submerse in a pan of hot soapy water, leave to soak for a couple of hours and then with latex gloves, hand wash cloth and hang dry. Reserve this cheese cloth for this particular process since the turmeric will permanently stain it and no matter how often you wash it, the pepper oils will linger in the cloth fibers.
To use:
Measure 1 - 1 1/2 ozs. in a shot glass,( a good place to start, but eventually you want to be up to 2 oz. per dose), and drink in 6 oz. of water, add a little honey if necessary to get it down, (or do what I do and just throw it back it one mouthful and swallow...not recommended for the uninitiated or faint of heart...), and oh yea... best taken on a full stomach.... This tonic will cure what ails you and will keep your immune system strong so that you don't catch every bug that is floating around out there. How does the old saying go...? "What doesn't kill you will make you stronger..." Really, I am not trying to scare you off... this stuff is great for your immune system and will strengthen you, protect and heal you from so many ailments it is worth the effort to make it and acquire a tolerance to it's fiery nature, but you will need to take it slow and build up to the recommended dose. Drink it mixed with as much water as necessary to make it comfortable for you, but you want to get the whole dose down, so don't put it in so much water that you don't get it finished.
Fire on the Mountain Tonic # Two
Ingredients
2 64 oz. bottles of organic apple cider vinegar with mother, (Braggs make a very good one, but it is expensive. I have found a very acceptable option at Sam's, Nature's Intent organic apple cider vinegar with mother. It is much more affordable and I can't taste a difference. The important part is that it is organic, raw and has "mother" in it, which is a collection of living organisms composed of a form of cellulose and acetic acid bacteria that develops on fermenting alcoholic liquids, which turns alcohol into acetic acid with the help of oxygen from the air).
2 cups of habanero peppers, split, (for those who are able to take the heat), or 3 cups of jalapenos, cut into 1/4" rings. If using jalapenos, then omit the next ingredient in the list, they are added to this amount for a total of the required peppers.
1 cup fresh jalapeno, cut into 1/4" rings
6 whole bulbs of garlic, cut in half through the equator,reserve two halves to be kept intact break apart the rest and bruise/mash with the flat edge of a knife. (No need to peel the cloves)
12 inches of fresh horseradish root, Scrub with a brush but do not peel, cut into 1/2" cubes
1 large hand of fresh ginger, or enough ginger root to equal 2 cups sliced ginger, washed and sliced into 1/4" thick slices. Do not peel.
1 1/2-2 cups sliced turmeric root, (12-15 or so rhizomes of fresh turmeric)
1/4 cup black peppercorns, bruised and cracked in a mortar and pestle or given a quick whirl in a bullet blender, you don't want it powdered just bruised and cracked.
1 large onion, root end and tip end cut off, loose skin removed, (leave the rest of the skin on), then cut into thin slices
2- 6" sprigs of rosemary
4 1/4" slices of lemon,(wash lemon well before slicing)
1/4 tsp. salt
Equipment
Apron
Sharp knife
Mandolin with slicing blade, optional but makes things more uniform and goes faster
2 half gallon Mason jars
2 4 oz. mason jar
2 Plastic wide mouth Mason jar lid (can be found at Walmart in the canning section, or purchased on Amazon,com), or a piece of plastic wrap and a two part metal Mason jar lid, ( *Due the fact that metal that is not stainless steel can taint the fermentation process, it is necessary to use a plastic lid or put a piece of plastic wrap between the rim of the jar and the two part wide mouth mason jar lid.)
Nitrile or latex gloves
9x13" pyrex dish or comparable sized plastic container with 1 inch sides
Strainer
16x16" square cheesecloth
Funnel
12x16" or larger piece of cheese cloth
1/2 gallon mason Jar or glass bottle with tight fitting lid that will hold the final volume of liquidWipeable, impermeable tablecloth
Instructions
Cover your work surface with wipeable tablecloth. Why? Well, the turmeric root will stain whatever it touches and it will not come out. Don the apron and make sure to put on your nitrile/latex gloves. If you have sensitive skin, double glove your hands.
Sterilize all jars by pouring boiling water to the brim and leave sitting until cool enough to handle. Pour off water and dry jar with a fresh, clean towel.
Place all ingredients except for the lemon slices in a blender in batches and blend with just enough vinegar to get things moving in the blender. Divide the blended ingredients equally between the two 1/2 gallon Mason jars and drop 2 lemon slices in each jar. Fill to the top with the apple cider vinegar.
Cover tightly with the plastic lids or with a piece of plastic wrap and the two part mason jar lids. Place in a tray or on a plate so that anything that might leak out drips on the tray and not your counter top. Place in a quiet part of your counter top where you will see it and remember to invert the jars twice a day for a week and then once a day for 4-6 weeks.
When ready, extract the tonic using the technique in the recipe above. Decant into storage container, just make sure that the tonic will fill the container leaving as little airspace as possible, to prevent any oxidization. This tonic is shelf stable and does not need to be refrigerated, although it does go down better if it is cold. Since this tonic takes awhile to make, (6 weeks), and will last indefinitely. It is a good idea to double or triple the recipe, to make sure you have plenty on hand and don't have to make it very often.
To use:
Measure 1 - 1 1/2 ozs. in a shot glass,(a good place to start, but eventually you want to be up to 2 oz. per dose), and drink in 6 oz. of water, add a little honey if necessary to get it down, (or do what I do and just throw it back it one mouthful and swallow...not recommended for the uninitiated or faint of heart...), and oh yeah... best taken on a full stomach.... This tonic will cure what ails you and will keep your immune system strong so that you don't catch every bug that is floating around out there. How does the old saying go...? "What doesn't kill you will make you stronger..." Really, I am not trying to scare you off... this stuff is great for your immune system and will strengthen you, protect and heal you from so many ailments it is worth the effort to make it and acquire a tolerance to it's fiery nature, but you will need to take it slow and build up to the recommended dose. Drink it mixed with as much water as necessary to make it comfortable for you, but you want to get the whole dose down, so don't put it in so much water that you don't get it finished.
A note or two, A recipe and some serving ideas:
Virgin Mary
3 stalks celery including the leaves, plus extra for serving
several dashes Worchestershire sauce, * vegans be aware Worchestershire has anchovies in it!! There are brands of vegan Worchestershire that can be purchased your local natural food/gourmet store.
Virgin Mary
3 stalks celery including the leaves, plus extra for serving
several dashes Worchestershire sauce, * vegans be aware Worchestershire has anchovies in it!! There are brands of vegan Worchestershire that can be purchased your local natural food/gourmet store.
1/8 tsp. or less to taste, celery seed
2 limes, juiced
48 oz. good quality tomato juice
Blend together all ingredients and store in a closed container in the fridge. For each beverage to be made, measure out 6-8 oz. of Virgin Mary blend and add 1 1/2 - 2 oz. shot of Fire on the Mountain Tonic. Stir well and enjoy with a celery stick swizzle stick. If you have had a particularly hard day, throw in a shot of good quality vodka, and have a Bloody Mary instead, relax and enjoy the burn!
Just a few other ways to get your tonic dose in...(besides just gripping the counter and throwing it down... wheezing and gasping until the burn stops... (just kidding... kinda...).
Mix a shot of tonic in with an individual serving of salsa and eat with chips.
Add to salad dressing for a taco salad, or top your tacos with a blend of tonic and salsa
Add to a rice dish once it is not piping hot from the pot.
Add to non-mayonnaise based cole slaw or cucumber salad
*Note#1- Since the whole idea behind this tonic is to consume the raw, living, fresh juice of the vegetables full of vitamins an enzymes, cooking with the tonic would defeat the purpose, so if you are adding this tonic to a food preparation, make sure the tonic is not cooked.
**Note #2- While there is an initial burn when consuming the tonic, at first their may also be a burn on the way out... uh... how do I say this delicately... have you every hear of Mexican Heart Burn?? Anyway, the burn that you may experience initially when going #2 will stop once your body is used to the tonic.
January 9, 2016
To Everything There is a Season...The Rhythms of Prepping, Part 1
For us prepping is a way of life. It has it's rhythms, seasons and time demands, all of which dictate how we live the rest of our lives. Really, I don't like the word Prepper as a description of what we do... we are not particularly preparing for an apocalypse, for societal meltdown or a global plague, what we are preparing for, is for life to happen. That could easily be a SHTF situation or it could be a personal health or financial hiccup. In what ever circumstance we find ourselves, we want as much of life as possible to be under our control; to be self-sufficient in as many areas of life as possible.
In the past, what we now call "Prepping", would have been the rule instead of the exception. People of my grandparents generation and all the generations before, knew that if they didn't take care of themselves, no one else was going to. They survived and thrived by doing for themselves, working with their hands, learning skills, growing food, creating solutions, and being satisfied with what they had or making do when no other resources were available. It has only been in the last few generations that we have become disconnected from the basic rhythms of life. Now as a society we teeter on the edge of collapse. Not because of all the threats, like terrorism, that lurk waiting for their moment to arrive or because of political machinations, or government ineptitude, but because as a society we don't have the knowledge or skills to survive if the very fragile and vulnerable infrastructure we live in should stop functioning.Years ago, when we were first married, my husband and I started to see societal disconnect from the values, practices, and knowledge of past generations. Opting instead for the convenient, the quick and the easy. Fearing that the experience and knowledge of the past would pass out of existence, and thus not be available for us to draw on, we started methodically to learn all that we could about as many self sufficiency subjects as possible. That has been going on for our 38 years together. We have amassed by study, practice and experience, many skills that we rely on daily. In our opinion, learning never stops, so we just keep adding to our collective pool of skills as we go along. I delight in learning new things, it is food for my soul, but I try to make sure in the present state of things, that what I put my time and brain power into also has a practical application.
For Preppers, knowledge is life. So our preparations include the acquisition of as much knowledge as possible, whether it is in our heads, or in a book that we have in our possession. Much knowledge comes from experience, but a vast quantity of information is presently available in books, Amazon.com has a huge selection of books, both new and used, on just about any subject imaginable. The used books are often very affordable, and a cheap book in used condition still holds the same info as a new one at 10x the price. Then of course there is the internet. Practically anything you could ever want to know is on the web, either in written form or on video, and is free for the taking. I often spend quiet moments in the evenings watching how-to videos or searching and printing information that I may need in the future, this lets me collect pieces of knowledge for digesting later.
I believe an important skill for a Prepper to have is to understand nature's signs and cycles, and to be able to correctly identify what needs to be done when. This means you don't miss an opportunity when it's moment has come. To give a few examples, by knowing your area's planting zone and first frost date you will know when to plant and when to make sure you have your harvest in. By knowing your forage seasons you will know what wild foods are available in what season and when to pick your medicinal plants. Knowing what time of year is the best time to cut trees for next years wood supply will save you drying time for the newly cut wood... by knowing when the nut crops are ready for harvest and being able to identify and locate the trees, you will be able to collect the nuts before the squirrels get them all. When do edible mushrooms appear in the woodlands or when can you tap sap for syrup? What is the best time of day to fish? What time of day do you harvest herbs for cooking or medicine? How can you tell when a frost is coming or when there will be rain without a weather forecast? What does the sky look like right before a tornado? What signals do animals gives us about inclement weather? Being well informed about natural rhythms and indications, will leave us less vulnerable should we suddenly not have our regular sources of information available.
Working within the framework of natural rhythms, we have developed a calendar of activities that we follow year after year. Our garden calendar runs like this... I plant early spring seedlings under lights in late November, mull over seed catalogs and tend early winter gardens in December. We order seeds for the year and plant out early spring crops in late December/ early January. Do ground work, establish new beds, weed and compost unplanted beds and start late spring seeds from mid January through February.
![]() |
| Seedlings started in mid-November are almost ready to be set out before Christmas |
![]() |
| Weeding and composting on a nice day In January |
We are harvesting early cold weather crops and filling harvested beds with late spring seedlings in March, as well as planting out hardy perennials flowers and herbs. April is a blur of harvesting, planting, fermenting and dehydrating. Even though April 15 is our last frost date, I never plant out warm weather crops before the first of May when the ground is consistently 70 degrees. Also, the area where we live is notorious for a surprise frost the last week of April, so I am patient and wait until May to put out my pepper and tomatoes. I am never sorry that I waited. May is the best month of the year in my opinion, the planting is done for awhile, the azaleas and roses are at their prime, birds are singing, the sun is warm but not hot... so May is my month to take it all in, have a garden party or just lay in the grass and watch the activity around me.
![]() |
| New Dawn rose in all her May glory |
![]() |
| The New Dawn roses's sweet pale pink blossoms |
![]() |
| Part of the Azalea Garden We have over 200 azalea bushes... there is no way to get them all in one photo! |
June begins a whole new flourish of activity, weeding, watering, succession planting, harvesting and putting up late spring garden goodies. June is also strawberry picking time, so I spend a lot of time hanging upside down in our strawberry beds, itching... (I am allergic to the strawberry leaves).
![]() |
| Sweet Charlie June Bearing Strawberries from our strawberry patch |
![]() |
| Mm-m-m Breakfast ! |
We also usually try to make a trip to the Fancy Gap area of Virginia in June, to pick cherries at Levering's for the freezer. July is the month to water, water, water, since we won't have much rain from June until late August. The blackberries will come on first and then blueberries. Because I will find myself picking buckets of berries from late afternoon until dark, I will need to plan for something easy to fix for dinners in July, something say, that includes blackberries and blueberries? One summer a few years ago, we picked 55 lbs. from 2 blueberry bushes... we have 15 blueberry bushes and 2, 40 foot rows of blackberries so that is a lot of picking!
![]() |
| Two 40 foot rows of heirloom variety Blackberries keep us in berries in July |
![]() |
| Blueberries on one of 15 bushes coming ripe. Soon there will be more berries than we can pick! |
![]() |
![]() |
| 54 tomato plants will provide us with fresh produce for our summer table and lots of tomatoes for making salsa and dehydrating |
![]() |
| Weighing and dehydrating Roma tomatoes for winter use. We weigh all the produce that comes out of the garden and keep records of food production. |
| A mix of ripe Jalapenos for chipotle, and habanerso for salsa |
![]() |
| Smoking jalapenos is pungent work... Whew! |
September, October and November, we harvest, put up and replant for a late fall garden. Our first frost date is 15 November, so by then I will have harvested most of the warm weather crops, leaving the peppers until the last minute to get the most out of the harvest. I garden barefoot, so when I feel a certain chill coming up from the ground and see a clear, crisp evening sky, that is a sure sign of frost, so my husband and I run out with a basket and a flash light to harvest the last of the peppers. During November, we will also erect our winter garden hoops to shelter some of the cool weather crops, like lettuces and other salad greens from a hard freeze. We will have kale, chard, lettuces, beets,and other root crops, cabbages and broccoli as well as oriental veggies and greens growing all winter.
![]() |
| Hoops are up just waiting for plastic |
![]() |
| Below freezing temperatures and several inches of snow outside |
![]() |
| A toasty 50 degrees inside! |
December will start the cycle over again. We rely heavily on our gardens and grow 365 days a year , thus securing food for our table now and for the future, should hard times arrive. So there is seed starting, seedling care, soil maintenance, transplanting, feeding, watering, weeding, harvesting and putting the food to use, fresh or preserved going on all year. There are always tasks to be done and schedules to keep in order to manage a year round food production system, so a certain portion of every day is spent on gardening tasks. But the garden seasons aren't the only cycles we work with... there is much more to life and to prepping than that!
I will continue to discuss other rhythms and calendars of prepping in Part Two and Part Three of this series. If you have any questions or would like to comment, please do! I love having a good chat and constructive feedback is always welcome! See you in Part Two!
Subscribe to:
Posts (Atom)